Your new post is loading...

|
Scooped by
173 Sud
|
Cameras vary in terms of functions offered. There are differences from one brand to the next and even from one model to another of the same brand. By necessity, this tutorial will have to generalize but let’s try to de-mystify some of the more common settings found on cameras today, what they mean (to the camera) and how to use them.
Let’s start with the core shooting modes, then we’ll move on to the more common preset scene modes and finally to some other general information about camera functions.
If you come across terminology or concepts here that are unfamiliar to you, it may be best to refer to part 1 of this series which uncovers how your camera work and what terms like ‘Aperture’ and ‘ISO’ mean.
|
|
Scooped by
173 Sud
|
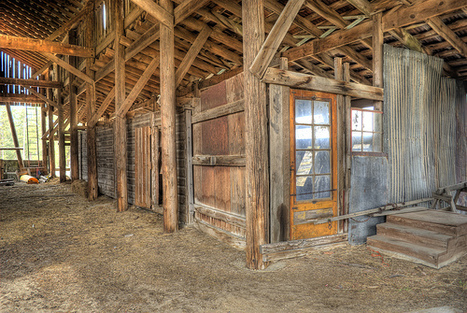
L'intérêt d'une photo HDR (Hight Dynamique Range Image : image avec une grande plage dynamique) est de permettre dans le même fichier de combiner plusieurs photos d'un même sujet mais avec des réglages d'exposition différents.
Cela permet d'avoir les informations nécessaires pour que les zones sombres (sous les voûtes, ombres des colonnes) et les zones claire (vitraux, éclairages intérieurs) soient toutes correctement exposées et surtout détaillées (pas de zones bouchées ou brûlées).
Ainsi , techniquement, une photo HDR est composée de plusieurs photos prises avec plusieurs étapes dans le réglage de l'exposition.
Les logiciels pour faire du HDR
1. FDRTools Basic (Windows, Mac)
Création de photos HDR à partir de plusieurs images, tone mapping, import d'images RAW.
2. HDRtist (mac)
Il permet de créer des photos HDR à partir de différentes images .
3. Photomatix Light (Windows)
Il permet de combiner plusieurs images pour créer une photo HDR, et dispose d'une fonction de tone mapping.
4. Artizen HDR (Windows)
Il permet de créer des photos HDR à partir de différentes images et dispose d'une fonction de tone mapping.
5. easyHDR Basic (Windows)
Il permet de créer des photos HDR à partir de différentes images.
6. Photosphere (Mac, Linux, windows)
Il permet de combiner plusieurs images pour créer une photo HDR
7.Fusin HDR (Windows)
Il permet de créer des photos HDR à partir de différentes images .
8. Qtpfsgui (Windows, Linux, Mac)
Un excellent logiciel, pour toutes plateformes. Et l'un des rares gratuits.
9. EnfuseGui (Windows, Mac)
Il permet de combiner plusieurs images pour créer une photo HDR
10. Funtastic Photo (Mac)
Il permet de créer des photos HDR à partir de différentes images .
11. Picturnaut (Windows)
Il permet de créer des photos HDR à partir de différentes images .
|
|
Scooped by
173 Sud
|
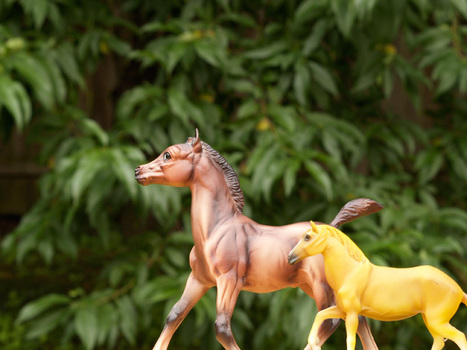
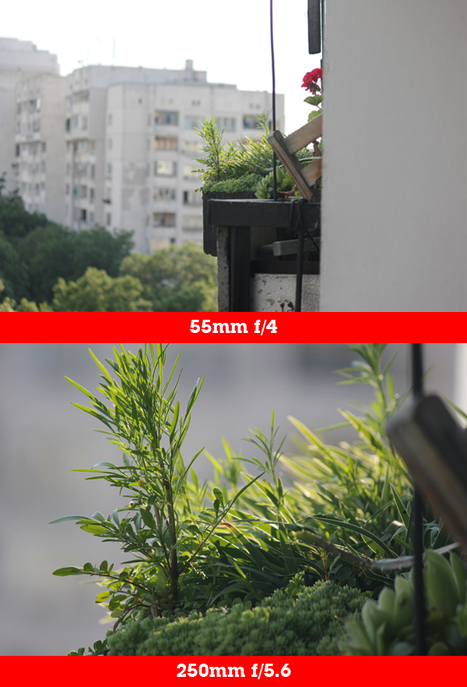
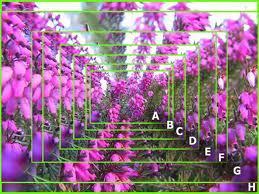
When we’re starting out in photography, understanding depth of field is the one of the first things we try to understand. What we often don’t realize is that depth of field is affected by more things than just aperture. In today’s tutorial, you’ll get some quick tips about the other factors that cause changes in the depth of the field of your images.
What is depth of field (DOF)
The simplest definition for depth of field is the area of your image that is in focus. More specifically, the distance between the nearest and the farthest object that are in focus. The shallowness of the depth of field depends of the f/stop also known as aperture, the focal length of the lens, the size of the camera sensor and distances between you, the subject and the background.
|
|
Scooped by
173 Sud
|
A well-composed photograph is really a matter of opinion, but there are a few tricks that tend to result in better pictures. That's what we're going to take a look at today.
Rule of Thirds
Perspective
Use Shapes and Lines to Draw the Eye to a Specific Point
Frame Your Subject with Objects
Make Your Choices for a Reason
|
|
Scooped by
173 Sud
|
Top 10 des logiciels gratuits pour trier et gérer vos photos
1. FastStone Image Viewer, le plus léger et compatible tous formats
2. Xnview, le plus complet
3. Picasa, le plus facile à utiliser
4. Windows live photo gallery, le plus graphique
5. Koffeephoto, le plus compatible
6. Irfanview, le plus rapide
7. imgseek, le plus organisé
8. SunlitGreen Photo Manager, le plus convivial
9. Studioline Photo Basic, le moins limité
10. Catalogue d'image, la banque photo personnalisée
Les logiciels de gestion d'images permettent aujourd'hui de créer des albums simplement, d'organiser ses milliers de clichés sans forcément être un as de l'informatique. Rapidité d'exécution, simplicité d'utilisation et fonctionnalités supplémentaires ont été les principaux critères de notre sélection de logiciels gratuits dédiés au rangement de ses photos numériques.
|
|
Scooped by
173 Sud
|
This nifty little trick will make your compact camera shots much better - and all it'll cost you is a tiny scrap of paper!
|
|
Scooped by
173 Sud
|
Connus ou personnels, généralistes ou spécialisés, accessibles ou pointus, ces blogs sont à ajouter les yeux fermés à votre sélection de sites photo.
Voici nos 9 favoris parmi de la sélection du Time !
|
|
Scooped by
173 Sud
|
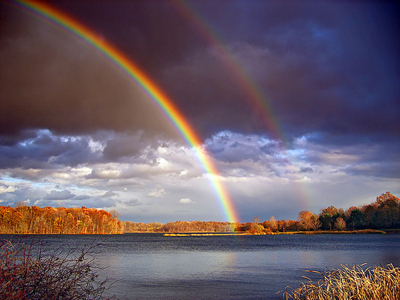
A Rainbow is something that has the power to stop you in your tracks when it unexpectedly appears when you’re least expecting to see one. They’re beautiful – but how do you photograph a rainbow?
Following are a few Rainbow Photography Tips that come to mind – feel free to add your own to comments below:
Find a Rainbow
This is the most obvious but also perhaps the hardest part of the process. Their appearance will depend upon the conditions and they are something that will often happen completely out of the blue. Having said this – you should especially be on the look out for rainbows when you have two elements present – falling/spraying water droplets and bright sunlight. As a result they’re common when a storm is approaching and around waterfalls/sprinklers/fountains.
Backgrounds
As rainbows are not solid objects one of the keys to photographing them is to capture them in front of a background that allows them to stand out as much as possible. Ideally you’ll want to get a background that is uncluttered and if possible one that has darker colors (think dark clouds, mountains etc). While it’s not always possible to change the background – you might find that you’re able to change the angle that you’re shooting from or to focus just upon part of the rainbow that is in front of a good background.
Composition
...
|
|
Scooped by
173 Sud
|
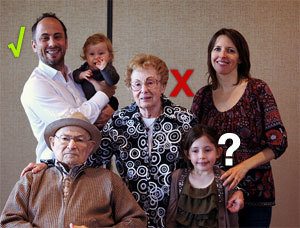
Take a minute and try to imagine what you look like. Chances are the amount of detail you're able to conjure up in your mind's eye is about as detailed and accurate as a self portrait you made in grade school. When you're in a photo, however, you try to look good by replicating a visual memory. You know what a smile looks like, so you make one. The problem is, this doesn't work. You need to remember what a smile feels like and not how it looks.
We've previously discussed the Duchenne smile—a true, believable smile—and shown you how certain muscles make all the difference, but not much about how this can actually help you out when you're getting your picture taken. A genuine smile is believed to be impossible to fake, so you need to feel some kind of genuine emotion to make it happen. This is easy enough, as you can just remember something that makes you laugh or happy. But I also believe you need to remember the feeling of a genuine smile—or any other expression—to replicate it in a photograph. If you just imagine what it looks like and try to fake it, you're probably going to get it wrong. If you can remember the feeling, you'll immediately recognize that feeling again—like a puzzle piece locking into place.
|
|
Scooped by
173 Sud
|
A lot of digital camera manufacturers boast about the model’s megapixel capabilities. But when it comes to digital photography more megapixels doesn’t always equal better quality photos.
Actually, it’s somewhat a myth. You don’t necessarily need a camera with a huge amount of megapixels to capture good images. Most point-and-shoot digital cameras these days range from about 10 to 14 megapixels and the SLR versions are usually higher.
But it’s not really the megapixels that are creating good, sharp images, it usually comes down to the quality of the sensor inside the camera as well as the lens you’re using.
|
|
Scooped by
173 Sud
|
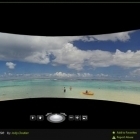
Creating and stitching together panoramic photos can be really tricky business. Photosynth makes the process so simple you don’t even need a tripod (or even a steady hand).
Photosynth stands a part from most other panoramic tools thanks to a super simple interface and a set of algorithms that seamlessly match up your photos even if you didn’t put the camera on a smooth panning tripod head. Photosynth does all the hard work of lining up, layering, and smoothing your images to create as big or as little of a panoramic as you want (some users create a basic 180 degree bank but you can do a complete 360 panorama if you have enough photos).
Photosynth is available as a Windows-based application or as an iOS application for on-the-go panorama creation. Hit up the link below to explore panoramas created by existing users and to grab a copy of the software. If you’re interested in using the iOS version, check out the MakeUseOf via link for an in depth look at it.
|
|
Scooped by
173 Sud
|
Bien évidemment, cet article ne s’adresse pas à vous les experts, les baroudeurs, les mordus. Ce sont des basiques, des évidences pour vous. Je pense à ceux qui débutent à peine et qui aimeraient aller plus loin avec leur réflex numérique.
Avec un trépied
Si la lumière est très faible, il faut plus de temps au boîtier pour capter cette lumière. On parle alors de vitesse lente ou pose longue. Pour vous donner un repère, 1/15 est une vitesse lente. D’ailleurs, en dessous de 1/60, je pense que l’on peut parler de vitesses lentes. La nuit, les conditions de prise de vue deviennent délicates. Il faut essayer de capter la moindre source de lumière. Dans ce cas, l’exposition pourra durer une seconde, voire plusieurs secondes. Ce sont des poses longues.
Qui dit vitesse lente, dit… attention au loup… heu non au flou. Utilisez donc un trépied et oubliez votre flash, il ne vous sera d’aucune utilité. Mesurez la lumière sur votre sujet principal. S’il s’agit d’un édifice éclairé par des projecteurs par exemple, choisissez une ouverture et mesurez la lumière sur le monument en utilisant la mesure spot éventuellement. Ajustez l’exposition en surexposant légèrement. L’appareil en déduira une vitesse. Enclenchez le retardateur, c’est l’idéal.
J’ai pu photographier ces magnifiques illuminations de lanternes chinoises à Montréal grâce à un trépied. Cela m’a permis de rester à 100 ISO et ainsi obtenir une image fine et bien colorée. J’ai ouvert à F4, la mise au point et l’exposition ont été faites sur les lanternes au premier plan. J’ai obtenu une vitesse d’une demie-seconde (1/2).
Si vous n’avez pas de trépied, posez l’appareil sur le toit de la voiture, sur un muret, etc …
A main levée
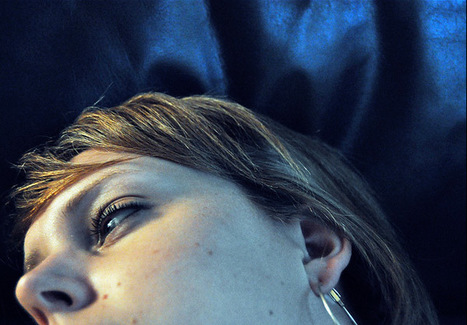
La nuit, il est possible de travailler à main levée et sans flash. Imaginons que vous vouliez photographier une personne en extérieur. Placez votre sujet sous un lampadaire, à proximité d’une vitrine éclairée ou dans la lueur des phares d’une voiture.
Optez pour une sensibilité assez élevée : entre 800 et 1600 ISO. Mettez vous en priorité ouverture. Choisissez F4,5 ou F2,8 si votre objectif vous le permet. Mesurez l’exposition sur son visage. Vérifiez que la vitesse est suffisante pour que l’image soit nette. Ajustez si nécessaire en surexposant. Mémorisez l’exposition ou reportez vitesse et ouverture en mode manuel. Faites plusieurs essais.
Je mets volontairement de côté la problématique de la température de couleur pour ne pas vous assommer de termes techniques. Sous certaines lumières, les visages apparaissent rouges, orangés. Il faudra donc recourir à certains réglages ou astuces. On abordera le sujet une autre fois, si vous le voulez bien.
|
|
Scooped by
173 Sud
|
.
Les logiciels payants de retouches photos coutent une fortune. Photoshop, pour ne citer que lui, propose différents tarifs. Je n’ai pas vérifier tous les produits sur le site d’Adobe mais certains peuvent aller jusqu’à 400 € ! En fouillant bien, vous pouvez dénicher des alternatives à Photoshop icon wink Les 5 meilleurs sites gratuits de retouches photos,
Quoiqu’il en soit, je ne suis pas du genre à dépenser autant d’argent pour un logiciel, d’ailleurs, je n’ai aucun logiciel payant installé sur mon PC. Je leur préfère soit une alternative gratuite, soit un service en ligne gratuit. De ce coté là, j’ai pu découvrir ce qui est pour moi les 5 meilleurs sites gratuits de retouches photos…
|
|
|
Scooped by
173 Sud
|
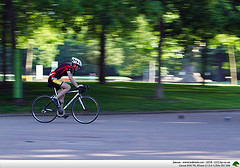
Vous êtes déjà demandé comment photographier un sujet en mouvement, que ce soit pour le figer ou au contraire pour mettre en valeur son mouvement ? En effet, il est souvent bien plus difficile de travailler avec ce type de sujet qu’avec un sujet fixe bien sage, qui laisse tout le temps de composer son image et de régler son appareil. Voyons donc ensemble comment relever ce défi.
C’est bien beau tout ça, mai le préalable indispensable, c’est de savoir ce que vous voulez obtenir comme cliché : un sujet bien net, où le mouvement est figé ?
1. un environnement net mais un sujet légèrement ou fortement flou pour mettre en valeur son mouvement ? (ça peut également être une partie d’un sujet flou, comme les bras d’un batteur par exemple ;
2. un sujet net, mais un environnement avec un flou « directionnel », selon la technique plus difficile du filé (si vous ne savez pas ce que c’est, je l’explique plus bas, pas de panique.
...
|
|
Scooped by
173 Sud
|
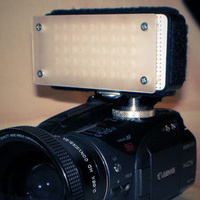
Sometimes lighting conditions aren't the best when you're recording video or taking pictures, regardless of how great your camera is. One of the best ways to remedy this situation is with a camera-mounted LED light. Problem is, good ones cost a few hundred dollars. Fortunately, you can make one yourself for a lot less.
Esnabez needed a light for his video camera so he decided to make one from scratch and it turned out pretty great. Want to see how well his tiny little light actually works? Check out this video and watch as it lights up a pitch-black living room. Pretty powerful, right?
While not the simplest of DIY projects, putting together this light shouldn't be too tough if you know how to solder. You just need a project box, a battery holder (and batteries), LED lights (of course), and a few other things to make this happen. Be sure to check out Esnabez' post on the HV20 Forum for the full how-to if you want to make it.
|
|
Scooped by
173 Sud
|
For our final photography lesson this week, we're going to talk about the final step: editing your images. We'll take a look at different kinds of techniques for color correction, touch ups, and a few other fun effects.
This lesson is really more of a roundup than anything because we've covered tons of photo editing tips and tricks in the past that it would be kind of redundant to re-write them all here. First things first, we have entire night school on Photoshop, including a lesson on color correction and touch ups, so you might want to start there. If you're looking for more, here are a bunch of handy tips and tricks to get your photos into shape.
Color and Tone Correction and Enhancement
Correcting Scratches, Blemishes, and Other Problems
Other Enhancements
|
|
Scooped by
173 Sud
|
Now that you've got a pretty good idea of how the different parts of your camera works, we're going to take a look at its various settings. In this lesson we'll cover the basics, and in the following lesson we'll take a look at manual mode.
Here's a look at what we'll be covering today:
. Shooting modes, or the different ways your camera can assist you in taking a photograph.
. Flash modes and when to use them.
. What different image enhancement settings do and what they're good for.
. Shooting assistance functions, like auto focus.
. A brief look at video mode.
|
|
Scooped by
173 Sud
|
With so many cameras available, figuring out how all the specifications and options translate into your everyday use is complicated. For our first lesson in the Basics of Photography, we're going to learn how cameras work and make sense of what that means in terms of choosing a camera to buy and how it affects your photographs.
|
|
Scooped by
173 Sud
|
Pour trouver des photos similaires sur internet ou faire des recherche d’image similaires c’ est une tâche plutôt facile à condition de trouver les bons outils. Cela dit, la recherche d’image sur interne n’en est qu’à ses balbutiements, mais on voit très bien qu’avec la réalité augmentée les choses arrivent à grand pas.
...
En attendant, voilà donc quelques sites de recherche de photo similaire :
Retrievr
labs.ideeinc.com/multicolour
Color.slightlyblue.com
Google.fr/image
Tineye.com
pixolu.de
macroglossa.com
Alipr.com
...
|
|
Scooped by
173 Sud
|
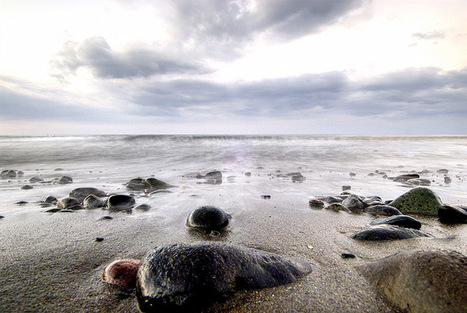
Today, we are going to look at 9 tips for improving your landscape photography. Nature can be an incredibly difficult thing to shoot. We’ll cover what equipment to bring, focus and composition issues and more. With the help of these tips, we hope to make shooting landscapes a bit easier.
Pack the right gear
Wide angle lens - A wide angle is a must with landscape photography, often you will want to capture as much of the scene as possible. If you are serious about landscape photography, think about upgrading from your kit lens to a dedicated wide angle prime such as 14mm or 20mm F2.8.
If you have room for a telephoto, you may as well pack it. Often you cannot get close to that perfect location and you occasionally have to shoot a scene from a great distance away.
Tripod - Come evening time, you are going to need a tripod to keep your camera nice and still. If a tripod is too large to carry around, why not try a tripod alternative such as a gorrillapod?
Cable release - A cable release or camera remote (or just using the self-timer) will always be helpful so you don’t shake your camera by pushing the shutter release at the beginning of a long exposure shot.
Spare battery - When shooting long exposures on a cold night, you will find that having a fully charged spare battery is very handy.
Get up early ....
|
|
Scooped by
173 Sud
|
The Golden Hour is sometimes referred to as the Magic Hour. It’s not to be confused with Happy Hour, although they do share similarities – it’s the one hour of the day you should look to take advantage of as much as possible.
To further confuse you, the Golden Hour occurs twice a day, so technically it’s the Golden Two Hours. It is essentially the first hour of light around dawn and the last hour of light around dusk. For outdoor photography, these hours are special, because the light is of a particularly beautiful quality. Tones are warmer, the light is softer and the shadows are longer.
Now for a little bit of science (and I mean “a little bit”). The reason the light is of a different quality at this time of day is due to the positioning of the sun. The closer the sun is to the horizon, the farther the light has to travel through the Earth’s atmosphere. This reduces the intensity of direct light, such as the kind you might see at high noon (think duels in Wild West films). During Golden Hour, more of the light comes from indirect light from the sky.
Contrast is less pronounced during the Golden Hour, so in landscape photography, shadows are less dark and highlights are less likely to be overexposed. Golden Hour is great for everything, in fact – portraits benefit from the beautiful, dramatic lighting, as the diffuse, soft, warm nature of the light is kind to skin tones.
I use The Golden Hour Calculator to find out exactly when the Golden Hour begins and ends. It’s absolutely brilliant – it shows you exactly when the Golden Hour starts and ends each day.
|
|
Scooped by
173 Sud
|
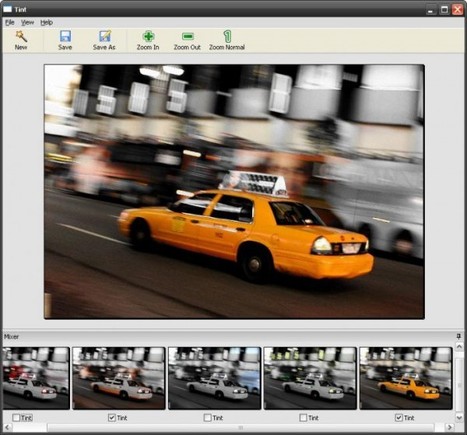
Si vos albums de photo s'ennuient, pourquoi ne pas s'amuser un peu avec vos images? La retouche photo, ça n'exige pas forcément de maîtriser Photoshop, ni GIMP. Il existe une foule de logiciels faciles à utiliser (gratuits ou en démo) qui permettent d'ajouter des effets saisissants à vos photos, et cela sans connaissances pointues.
Envie de créer un effet Polaroid ou un rendu crayon à papier? Un fini glamour ou un tableau Pop Art à la Andy Warhol? Rien de plus facile avec cette sélection de logiciels pour ajouter des effets à ses photos.
|
|
Scooped by
173 Sud
|
Today, we look at 15 tips for improving your portraits. These can be put into practice no matter what camera you have. They can help if you want a professional portrait to place on your wall or if you just want a striking new facebook profile picture.
1. Engage your subject
2. Backgrounds
3. Lighting
4. Perspective distortion and different lenses
6. Camera angles
7. Diptychs
8. Rule of thirds
9. Long exposure
10. Depth of field
11. Multiple shots
|
|
Scooped by
173 Sud
|
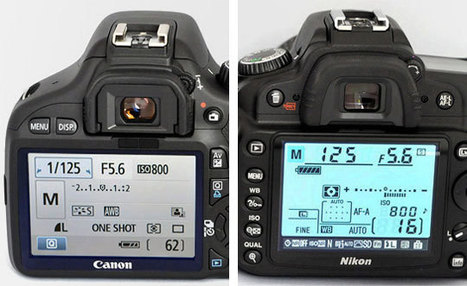
Hi guys! With Labor Day weekend coming up, I know a lot of us are going to be out there taking pictures! :) Since we have a long weekend to practice, I wanted to share with you this basic intro to SLR photography. If you have an SLR camera and are nervous to take it out of auto mode, this is the tutorial for you.
You may have heard words like aperture, exposure, and shutter speed and wondered just how on earth they come together to give you a better photo. I’ll give you a brief introduction on what they do and how they affect your photos turning out too bright, too dark, too blurry or JUST RIGHT. :) This guide will show you how to get the most out of your SLR camera and give you confidence to take it out of auto mode in no time!
|
|
Scooped by
173 Sud
|
Online Photo Editors? Are you serious? Yes! Have you ever heard about the terms Cloud Computing and SaaS – software as a Service? Both terms are among the most hyped in the IT space right now and many experts believe they represent a mega trend that are just about to change how we all use and access software for ever. There is still a lot of hype related to both terms and in particular cloud – and many software and infrastructure vendors have added “cloud something” to their portfolio which is making it even harder for most people to understand what “cloud” has to do with software and IT service offerings. In its simplest form cloud computing is just flexible computing power available as a service with a pay-per-usage model – to be compared with electricity in the power socket.
Amazon, Google, Microsoft and many others are competing to get a good start in the cloud market. And SaaS is software and applications provided in the cloud instead of being installed locally on a PC – typically designed to be multi multitenant – meaning that multiple users access the same instance of an application. This model drives costs down, removes need for local maintenance and let’s users get started much faster. While the cloud and SaaS wave is rocking the enterprise software boat a lot it turns out that there are also many interesting Photo Editors available on a SaaS model – many even completely free!
Generally they are not as feature rich and fast as e.g. good old Photoshop, but they are improving and in most cases they have the commonly needed features and much more. Another good thing about Online Photo Editors is that they can be accessed from anywhere and any computer with Internet connection.
Let’s take a closer look at some of the most useful Online Online Photo Editors available right now.
|